
Are you looking for alternatives to Final Cut Pro? If so, you’re in the right place. Final Cut Pro is a powerful video editing software that’s widely used by professionals and amateurs alike. But it can be expensive and difficult to use for beginners. Luckily, there are plenty of great alternatives out there that offer similar features at more affordable prices. In this article, we’ll look at 8 of the best Final Cut Pro alternatives available today and what makes them stand out from the competition. Whether you’re a beginner or an experienced editor, these options will help you create professional-looking videos without breaking the bank. So let’s dive in!
Adobe Premiere Pro
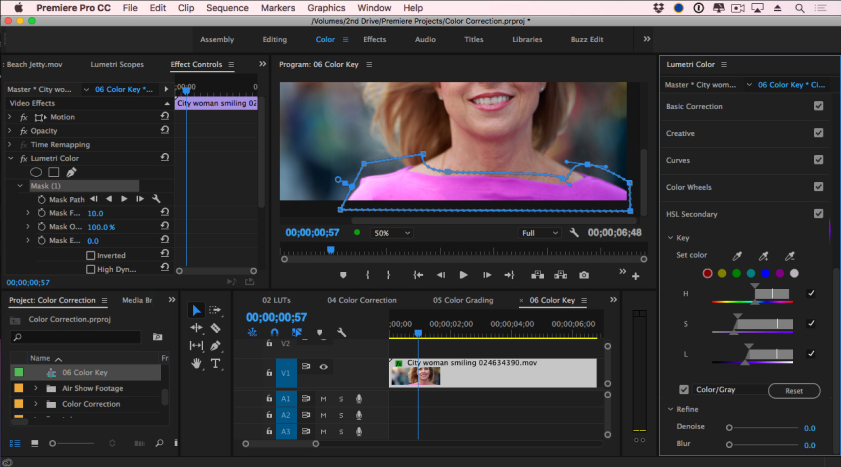
Adobe Premiere Pro is one of the most popular alternatives to Final Cut Pro. It is an excellent tool for editing videos, and it offers a wide range of features that make the video editing process easier and more efficient. One important feature to note is the timeline panel, which allows users to organize their projects in chronological order. This enables users to create transitions between clips, add audio or visual effects, and create titles quickly and easily. Additionally, Adobe Premiere Pro offers powerful tools for color grading, which can be used to create a more unified aesthetic in your videos. It also includes advanced editing tools such as the ripple edit tool and the track select tool, which make it easier to move clips around without changing other clips in the timeline. Finally, Adobe Premiere Pro can be used to export finished projects into different formats that are compatible with various platforms, such as YouTube or Vimeo. With all these features, Adobe Premiere Pro is a great tool for editing videos efficiently and effectively.
Pricing: Adobe Premiere Pro is available as part of the Adobe Creative Cloud subscription, which starts at $20.99/month.
Pros:
- Easy to use for beginners
- Wide range of features
- Integrates with other Adobe products.
Cons:
- Subscription-based pricing can become expensive over time.
Here’s how to use Adobe Premere Pro:
- To get started, you’ll need an up-to-date version of Adobe Premiere Pro installed on your computer.
- Once you have the software installed, you can begin the process of creating a new video project. To do this, click on ‘File’ in the top menu bar and select ‘New’ from the drop-down options. This will open up a window where you can name your project and choose where to save it.
- Next, you’ll need to import all of the media you plan on using in your video, such as video footage and music. To do this, click on ‘File’ again and choose ‘Import’ from the drop-down menu. Then browse to where your media is stored on your computer and select it for import into Premiere Pro.
- Once all of your media is imported, you can begin working with it in the timeline. Here, you can add transitions, trim footage, and more to create a professional-looking video. To adjust an edit point on the timeline, simply drag and drop it to where you want it to be.
- You can also add effects and titles to your video by selecting them from the ‘Effects’ panel on the right side of the window. To add an effect or title to your video, simply drag and drop it onto the timeline where you want it to be.
- Finally, when you’re happy with how your video looks, you can render it for playback or export it for publication. To do this, go to File > Export > Media and choose the desired format. Then select a location to save your video and click ‘Export’.
Avid Media Composer
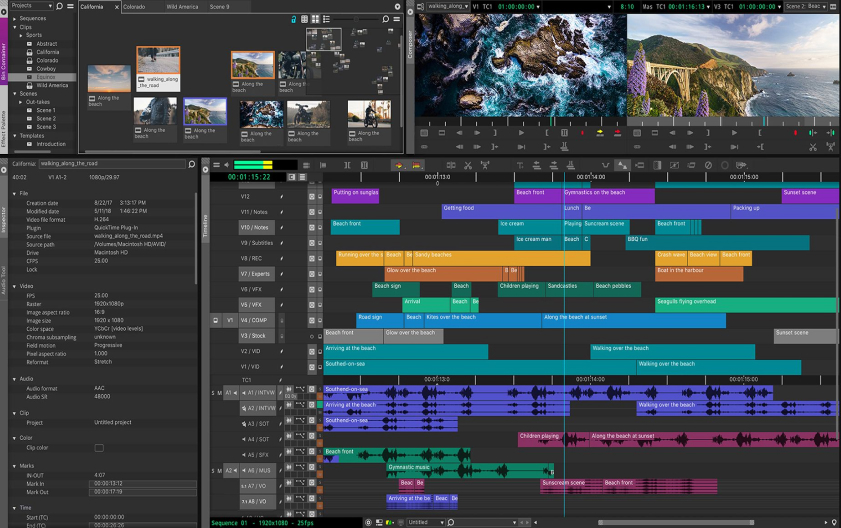
Avid Media Composer is another popular choice for editing video. It’s a professional-level application with tools designed to meet the needs of filmmakers and media professionals. Avid Media Composer has an intuitive interface that makes it easy to use, even for beginners. Plus, its powerful features allow users to edit videos quickly and easily.
Pricing: Avid Media Composer is available for purchase outright for $59.99/month or as part of an annual subscription starting at $49.99/month.
Pros:
- Intuitive interface
- Powerful features
- One-time purchase option.
Cons:
- Subscription-based pricing can become expensive over time
- Not as widely used as other options.
Here’s how to use Avid Media Composer:
- The first step is to install the software on your computer. Avid offers a free trial of their software that you can download from the website.
- Once installed, open the program and you will be presented with a variety of options for creating projects, organizing media files and editing footage. There are also options for customizing the interface and setting preferences according to your personal preferences.
- Once you begin working in the program, it is important to become familiar with the timeline and editing tools. The timeline is where you will arrange your media files and create edits. To add clips to the timeline, drag them from the source window located on the left side of the screen onto an empty track. You can then right-click a clip to open up a menu of editing options, including trimming, splitting and adding effects.
- To make your project look professional, you can add visual effects (VFX) such as transitions, titles and motion graphics. Avid also provides powerful color correction tools for fine-tuning the footage. Once your edits are finished, you can use the Export window to save the project in a variety of formats including H.264, MXF and QuickTime.
Apple iMovie
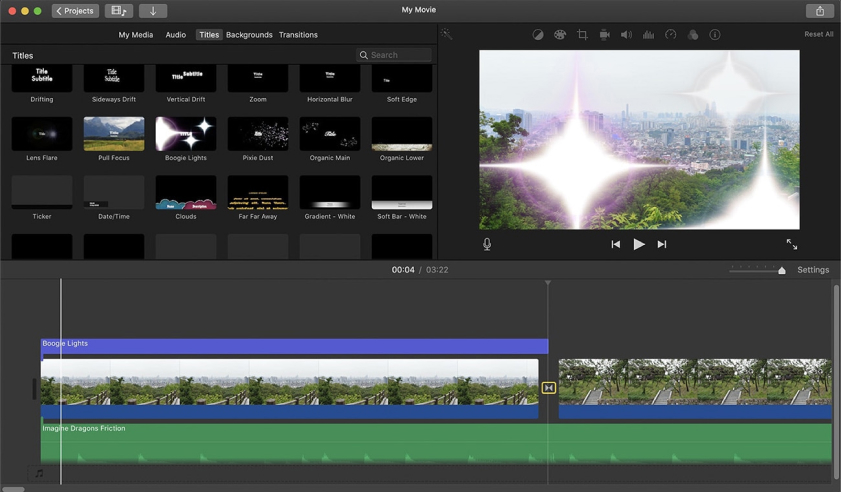
If you’re looking for a free alternative to Final Cut Pro, Apple iMovie is a great choice. It’s pre-installed on most Macs and offers a wide range of features for beginners and experienced users alike. From basic editing tools to advanced effects like picture-in-picture and split screen, Apple iMovie has it all. Plus, its slick interface makes it easy to use and navigate.
Pricing: Apple iMovie is free with any Mac purchase.
Pros:
- Easy to use for beginners
- Free with any Mac purchase
- Slick interface.
Cons:
- Limited advanced features compared to other options
- Not available on Windows.
Here’s how to use Apple iMovie:
- Downloading and Installing: Before you can use Apple iMovie, you must first download and install the app. To do this, simply search for “Apple iMovie” in the App Store or iTunes Store and click “Download” to start the process. Once installed, open the app and you are ready to begin.
- Basics of Editing: To edit your video files, select the “Edit” tab from the main menu. From here you can choose from a variety of tools and effects such as trimming, cropping, adding transitions and adjusting colors. You can also add text to your clips, create picture-in-picture effects or even split screens.
- Sharing Your Movie: Once you are done editing your movie, you can share it with friends and family. To do this, select the “Share” tab from the main menu and choose your preferred method. Apple iMovie supports sharing through email, YouTube, Vimeo and other popular services.
WeVideo
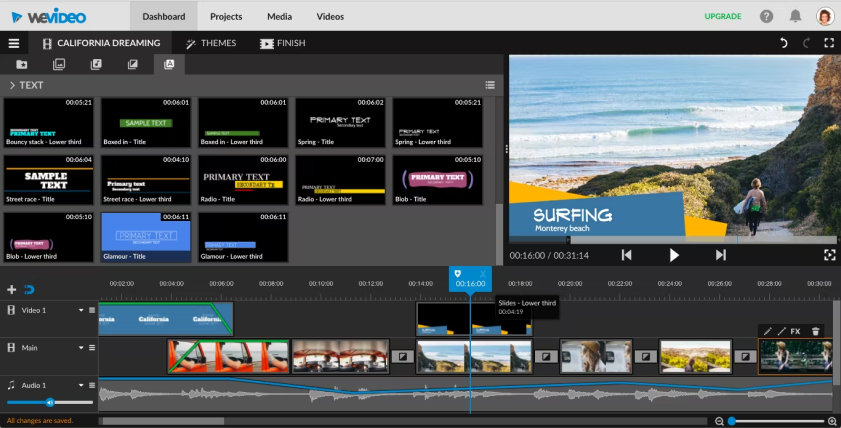
WeVideo is a cloud-based video editor designed with collaboration in mind. It’s a great option for teams that need to work together on projects, as it allows multiple users to access and edit the same file at the same time. WeVideo also has powerful tools like video stabilization and chroma key, making it a great choice for advanced users.
Pricing: WeVideo offers a free plan with basic features and limited storage, as well as paid plans starting at $8/month.
Pros:
- Cloud-based collaboration
- Powerful tools like video stabilization and chroma key
- Free plan with basic features.
Cons:
- Limited storage with free plan
- Advanced features can be expensive.
Here’s how to use WeVideo:
- Select a Project Type – You can choose one of the project types available from the home page or start from scratch.
- Upload Your Media – To add media to your project, you can upload files directly from your computer, import them from various online sources such as YouTube and Dropbox, or select files from your WeVideo library.
- Arrange Your Media – Once you’ve uploaded your media, it’s time to start arranging them into a sequence that makes sense for your video. With WeVideo, you can easily drag and drop files and even trim clips to quickly achieve the desired look of your project.
- Enhance Your Video – Now it’s time to customize your video with title cards, transitions, text overlays and more. WeVideo provides a wide range of tools that make it easy to add professional touches to your work.
- Export Your Video – When you’re finished editing, you can export your video in a variety of formats including H264, MP4 and even animated GIFs.
DaVinci Resolve

DaVinci Resolve is a powerful editing and color correction suite from Blackmagic Design. Its wide range of tools make it perfect for both beginners and professionals, while its interface is designed to be intuitive and easy-to-use. DaVinci Resolve also integrates with other Blackmagic products, making it a great choice for filmmakers who want to create professional-looking videos.
Pricing: DaVinci Resolve is available for purchase outright for $299 or as part of a subscription starting at $14.99/month.
Pros:
- Intuitive interface
- Powerful tools
- Integrates with other Blackmagic products.
Cons:
- Pricey upfront cost
- No free plan.
Here’s how to use DaVinci Resolve:
- To get started, open the application and create a new project.
- Once the initial setup is complete, you can begin adding clips to your timeline. The clips can be imported from any supported source such as an external camera or memory card. To add a clip to the timeline, simply drag it from the media library and drop it in place.
- Once all clips have been added, you can begin editing them. To trim a clip, use the selection tool to select the part of the video that needs to be trimmed and press enter or click on “Trim” in the menu bar at the top. For more advanced editing techniques, you can use the cut command to remove frames from your video or split a clip in two. You can also use the ripple edit feature to quickly move clips around and rearrange them.
- Once editing is complete, you may want to add effects or transitions. DaVinci Resolve includes a range of built-in effects and animations that are easy to apply. To add an effect, simply drag it from the Effects Library and drop it into your timeline. You can adjust the parameters of each effect or transition in the Inspector window.
- When you are happy with the results, you can export your video in a variety of formats including 4K UHD, HD, SD and more. You can also upload directly to YouTube or other video platforms.
HitFilm Express
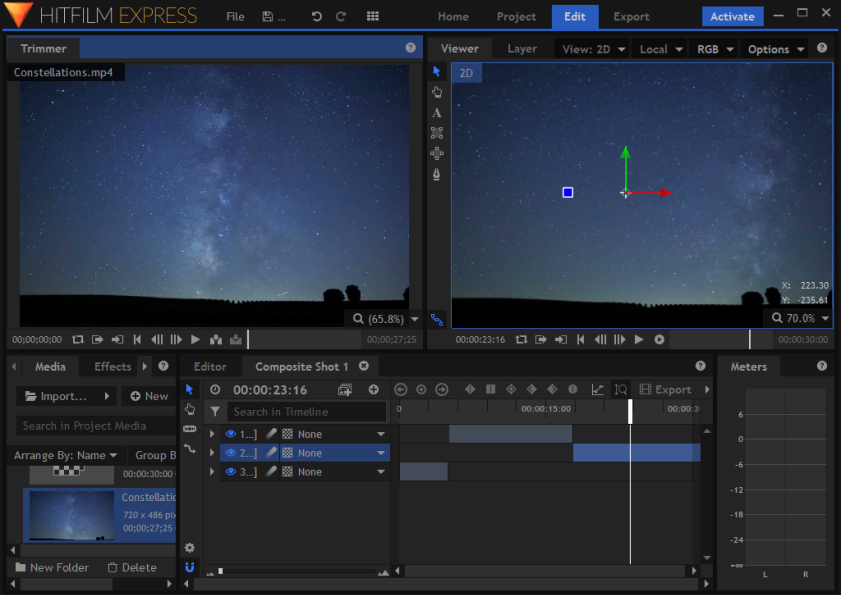
HitFilm Express is a great choice if you’re looking for a powerful and affordable video editor. It offers a wide range of features, including motion graphics, 3D animation tools, and color correction. Plus, its intuitive interface makes it easy to use even for beginners. And best of all, it’s completely free to use.
Pricing: HitFilm Express is a free video editor.
Pros:
- Powerful features
- Intuitive interface
- Completely free to use.
Cons:
- Limited support compared to paid options
- Not as widely used as other options.
Here’s how to use HitFilm Express:
- After downloading and launching the software, click “New Project” to create your own movie. From here you can access a wide range of tools designed for editing video clips, adding titles and transitions, creating effects, and much more.
- HitFilm Express offers a variety of ways to edit your clips. You can trim them down by dragging the edges of the clip, or add effects such as color correction and special effects. You can also use the audio mixer to adjust the volume of a particular clip.
- When you are ready to export your final project, simply click on “Export” from the main menu and select an output format (MP4, MOV, etc.). Your movie is then rendered and saved in the selected format.
Lightworks
Lightworks is a professional-level video editing application with features designed to meet the needs of filmmakers and media professionals. It’s packed with powerful tools like motion tracking, color correction, and 3D rendering, making it perfect for more advanced users. Plus, its streamlined interface makes it easy to use even for beginners.
Pricing: Lightworks is available for purchase outright for $79.99 or as part of an annual subscription starting at $54.99/month.
Pros:
- Powerful features
- Streamlined interface
- One-time purchase option.
Cons:
- Subscription-based pricing can become expensive over time
- Not as widely used as other options.
Here’s how to use Lightworks:
- First, download and install Lightworks software for your platform. Once installed, launch the program and you’ll be presented with a timeline view in the main window. Here you can add and edit video clips, images, music, and more.
- Once your footage is imported into Lightworks, you can begin editing them by dragging them onto the timeline. You can trim clips or apply effects, and use the preview window to see how each clip looks. It’s also possible to key-frame animations or add transitions between clips for smoother playback.
- Once you’re happy with your edit, you can export it to a number of popular formats or share it directly on social media. Lightworks also offers a range of advanced features including colour correction tools, audio mixing, and more.
VSDC Video Editor
VSDC Video Editor is a free, yet powerful video editor for Windows users. It has an intuitive interface and offers a wide range of features, including trimming and cutting tools, audio effects, and motion tracking. Plus, it can handle HD, 4K, and even 8K videos with ease.
Pricing: VSDC Video Editor is a free video editor.
Pros:
- Intuitive interface
- Wide range of features
- Completely free to use.
Cons:
- Not available on Macs or other platforms
- Limited support compared to paid options.
Here’s how to use VSDC Video Editor:
- Once you’ve downloaded VSDC Video Editor, the first step is to import your media files – such as video clips, audio tracks, and photos – into the program. You can drag and drop them directly to the timeline editor, or use the media library option for a more organized approach.
- The next step is to start customizing your project. VSDC gives you access to a variety of tools that you can use to tweak the video clips, add transitions between different scenes, apply effects such as color correction and filters, and more. Additionally, you can add text layers to create titles or captions, or draw on the video with the freehand drawing tool.
- Once your project is complete, it’s time to export it for sharing. VSDC Video Editor allows you to save projects in all popular formats like MP4, AVI, and MOV. You can also upload your projects directly to social media sites such as YouTube or Facebook, or share them with other users via email or cloud storage services.
How to choose the best video editor
Choosing the best video editor for your needs depends on several factors, such as the type of projects you’re working on, your budget, and your experience level. You should also consider features like trimming and cutting tools, color correction and motion tracking capabilities, ease of use, and pricing. With so many different options out there, it can be hard to know where to start. That’s why we’ve put together this guide, so you can find the perfect video editor for your needs.
- Consider your budget
The first step in choosing the best video editor for you is to consider your budget. If you’re looking for a free or low-cost solution, then options like Apple iMovie, HitFilm Express, and VSDC Video Editor might be your best bet. However, if you’re willing to invest more money into a professional-level application with advanced features, then Avid Media Composer, DaVinci Resolve, and Lightworks might be better options.
- Think about features
Once you’ve narrowed down your choices based on budget, it’s time to consider the features each video editor offers. Consider which tools are most important for your projects, such as color correction and motion tracking capabilities. Also, look into the ease of use and interface design of each video editor. The last thing you want is to be overwhelmed with a difficult-to-navigate editing system.
- Check platform availability
When selecting your video editor of choice, make sure to check what platforms it’s available on. Many professional-level editors like Avid Media Composer and Lightworks are only available on Windows, while free options like Apple iMovie and VSDC Video Editor are only available for Macs or PCs.
- Browse user reviews
It’s always a good idea to check out user reviews of the video editor you’re interested in. Reviews can give you an insight into how the software works in practice and what areas could use improvement.
- Test the demo version
If your chosen video editor offers a free trial or demo version, make sure to take advantage of it. This will give you the chance to see how the software works in practice and determine if it’s right for you.
By considering your budget, features, platform availability, and user reviews, you’ll be able to find the perfect video editor for your needs. With the right video editor, you’ll be able to create amazing projects and take your filmmaking or vlogging career to the next level.
Guide on how to start editing videos for beginners
Now that you have some background information on the different video editors available, it’s time to start editing! Here are a few steps to help get you started:
- Read the manual or tutorials – most video editors come with a comprehensive user guide and tutorial videos, so make sure to read through them before starting. This will help you become more familiar with the features and tools available and will save you time in the long run.
- Choose your video editor – consider your budget, features, platform availability and user reviews to find the perfect video editor for you.
- Download and install the video editor onto your computer – once you have chosen your video editor, download the software onto your computer and install it.
- Familiarize yourself with the interface and tools available in the video editor – spend some time getting to know the interface, tools and features of your chosen video editor.
- Gather all of your media, including videos, images, music, etc., for your project – once you have the software installed, begin collecting all of your media for your project.
- Create a timeline or storyboard to map out the order of your project’s narrative – storyboarding will help you visualize the order in which your video or film is going to flow.
- Start adding your media to the timeline and begin editing – once you have added all of your media to the timeline, start editing and adding effects.
- Add titles, special effects, filters, and other elements to enhance your project’s visuals – this will help your video stand out from the crowd.
- Preview your project multiple times throughout the process and make adjustments as needed – previewing your project multiple times while editing will allow you to make sure that everything is looking and sounding the way you want it to.
- Export your project in the desired format for saving or sharing online – once you have finished editing, export your project in the format of your choice for sharing or saving online.
By following these steps, you can get started with video editing and produce amazing projects in no time. With practice and dedication, you’ll be able to master the art of video editing and become a pro in no time! Good luck!
Conclusion
When it comes to finding an alternative to Final Cut Pro, there are plenty of options available. Whether you’re looking for a free video editor or one with advanced features and powerful tools, there’s something out there that will meet your needs. Adobe Premiere Pro is great if you want access to other Adobe products, while Avid Media Composer is perfect for professionals who need the most cutting-edge editing tools. And if you’re on a budget, both Apple iMovie and HitFilm Express are completely free solutions that offer basic features as well as some more advanced ones. No matter what kind of project you have in mind, these 8 alternatives should help get the job done!

For 8 years, Madeline has been working as an CGI specialist and digital video producer since his student years. Now, she’s our main consultant on every technical aspect that may arise during our tests and research.
In case you haven’t found something, or have a question on some specific guide, product, or just a feature, we are always ready to help.