
2023 is going to be an exciting year for music video makers. With the advent of professional video editing software like Adobe Premiere Pro, Corel Video Studio, and Sony Vegas Pro, creating a high-quality music video has never been easier. Here are 10 best music video makers that you should try out in 2023.
Animoto

This cloud-based video editing software is perfect for creating professional music videos in no time. It offers a wide range of features such as custom music and soundtracks, photo and video clips, and animations that can help you create unique visuals that will wow your viewers.
Pricing: Free trial, subscriptions starting from $9/month
How to make a music video with Animoto:
- First, select the type of project you want to create – either a Music Video or Slideshow. If you choose the Music Video option, you can upload your own audio tracks or access the Animoto library of licensed music to use as background music for your video.
- Once you’ve selected your audio track, add photos or videos to create a visual storyboard that will be set to the beat of the song. Animoto has a wide selection of animated graphics and transitions you can use to give your music video a professional look. You also have the option of adding text to narrate your story as it unfolds.
- When you’re done, Animoto will automatically generate a high-quality HD video that is ready for sharing on social media platforms such as YouTube, Vimeo or Facebook. So take some time to explore Animoto’s tools and create a stunning music video that will captivate your audience.
Pros:
- Easy to use
- Cloud-based
- Access to stock photos & videos
Cons:
- Limited editing options
- No 3D effects
Magisto

This is an AI-powered video maker that can help you create stunning music videos with ease. It has a wide range of features such as automatic editing, special effects, and an audio equalizer for creating perfect soundscapes. Plus, it offers a library of licensed music to choose from so you don’t have to worry about copyright infringement.
How to make a music video with Magisto:
- To begin, you’ll need to upload your songs and a selection of photos or videos that will be used in the video.
- Once uploaded, you can use the editing tools provided by Magisto to clean up any audio or visual elements you’ve added, change how long each section of the video will be, and add in titles, captions, or voiceovers.
- After you’ve set up your video project, it’s time to select a style for your music video. Magisto offers several themes to choose from including; Action, Comedy, Drama, Romance, and Horror. Each theme has its own unique look and feel that can be used to enhance your music video.
- When you’ve chosen a style, you can add in special effects such as slow motion or speed up the video clips and images. Magisto also offers audio tools that allow you to adjust the volume of different tracks within the music video, add sound effects, or create background music.
- Once you’re finished editing, you can save your music video and share it with friends. Magisto makes it easy to upload your creation directly to YouTube or other social media sites. You can also export the video in a variety of file formats so that you can view it on any device.
Pricing: Free trial, subscriptions starting from $4/month
Pros:
- Easy to use
- AI-driven editing
- Access to licensed music
Cons:
- No 3D effects
- Limited customization options
WeVideo
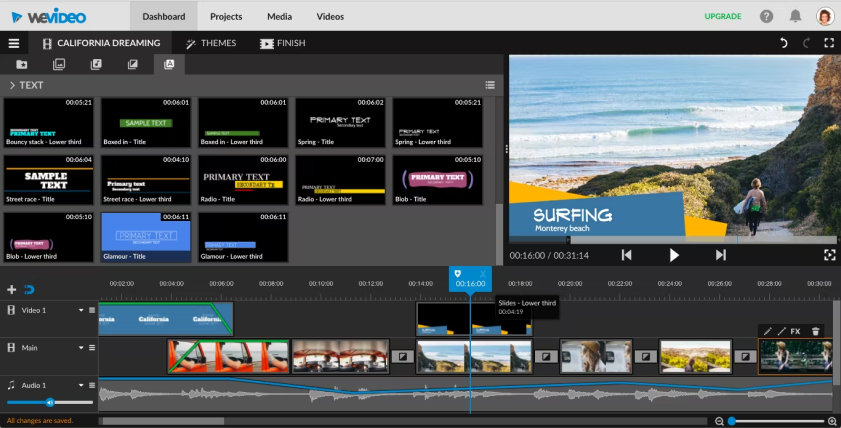
If you’re looking for a powerful yet simple video maker, WeVideo is your best bet. It offers all the features of a professional video editing software such as drag-and-drop timeline editing, motion tracking, and 4K resolution output. Plus, it has an extensive library of royalty-free music and sound effects to choose from.
How to make a music video with WeVideo:
- Upload your footage into WeVideo
- Create a storyboard to help plan out your video
- Add motion graphics, transitions, and text animations for added flair
- Incorporate your favorite song or soundtrack into the video
- Add photos of yourself or others that appear in the video
- Preview and finalize your music video using WeVideo’s tools
- Share your video on social media or with friends!
Pricing: Free trial, subscriptions starting from $7/month
Pros:
- Drag-and-drop timeline editing
- Motion tracking & green screen effects
- 4K resolution output
- Access to royalty-free music and sound effects
Cons:
- Limited customization options
KineMaster

KineMaster is a popular video editing software that’s specifically geared towards creating music videos. It offers advanced features such as multi-track audio, chroma key support, animated titles, and color filters for making professional-grade music videos. Plus, it comes with an extensive library of royalty-free music to choose from.
How to make a video with KineMaster:
- Choose a Song – The first step is to choose the track or song that will be featured in the music video. This will serve as the soundtrack for your video, so pick a song that matches the mood you’re trying to convey and that fits with any visual effects you might be thinking of using.
- Add Media – With KineMaster, you can add photos, videos, text, animation and other media elements to your project. After selecting your media, you can arrange them into a timeline and start editing.
- Enhance Clips – Apply effects to enhance each clip and make sure they match the mood and style of your music video. To keep things interesting, you could add transitions between clips or use creative effects to give the video a more dynamic feel.
- Add Visual Effects – You can add special visual effects, such as picture-in-picture or split screen, to your video. These effects will help you create a more dynamic and professional look for your music video.
- Add Audio – Besides the song track, you can also add other sound effects to your video. For instance, if there are sound clips in scenes that need an extra boost, you can add them to your project.
- Finalize – Once you’re done editing, review the entire music video for any mistakes or problems. Make sure everything looks and sounds the way it should before exporting it as a final product.
Pricing: Free trial, subscriptions starting from $7/month
Pros:
- Advanced features such as multi-track audio & chroma key support
- Animated titles & color filters
- Access to royalty-free music library
Cons:
- Limited customization options
- No 3D effects
DaVinci Resolve

For those who are looking for a powerful video editing software, DaVinci Resolve is the way to go. It offers features such as advanced color correction, audio post-processing, and motion tracking that can help you create stunning music videos with ease. Plus, it has an extensive library of licensed music and sound effects to choose from.
How to make a music video with DaVinci Resolve:
- The first step in creating a music video with DaVinci Resolve is to import your media. You’ll need an audio track and at least one video clip for the duration of the music. To do this, click on the Media tab from the main dashboard, then select Import Files. From there, you can choose which audio and video files you’d like to use.
- Once you’ve imported the media, it’s time to start assembling the elements of your music video. Open up a timeline from the top of your screen and drag each clip into its place. DaVinci Resolve provides a wide array of tools for editing audio clips and adding effects to videos. You can adjust the volume levels, add fades, and even apply transitions.
- Once you’ve edited your clips to perfection, it’s time to export the project. Select Export from the main dashboard and select a file format for your video. DaVinci Resolve supports many popular formats such as AVI, MOV, and MP4. After selecting a file format, click on Export and wait for the process to finish.
- Now that you have your music video ready to go, it’s time to share it with the world! DaVinci Resolve makes it easy to upload videos directly to YouTube or Vimeo. Simply select “Share” from the main dashboard and enter your credentials for the platform of choice.
Pricing: Free, subscriptions starting from $299/year
Pros:
- Advanced color correction & audio post-processing
- Motion tracking & green screen effects
- Access to licensed music and sound effects
Cons:
- Expensive subscription plans
- No 3D effects
Adobe Premiere Pro
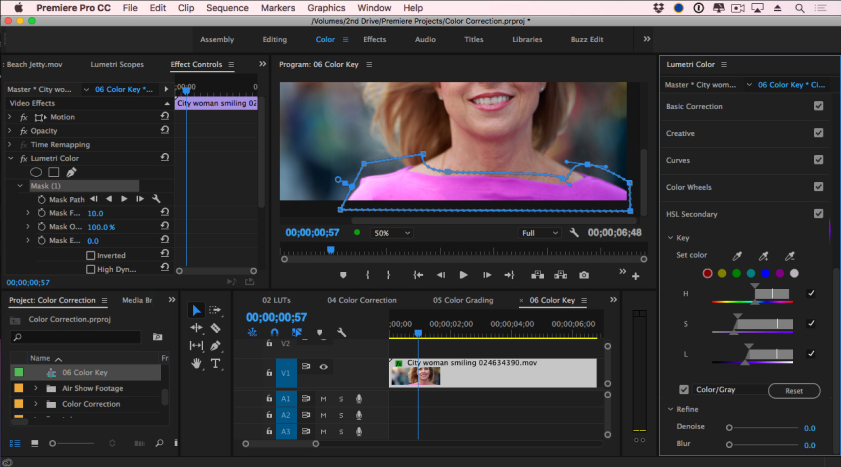
This is the industry-standard video editing software that offers all the features you need to create professional music videos. It has a timeline-based workflow with powerful editing tools, multi-track audio support, and an extensive library of sound effects and stock music. Plus, it supports 4K resolution output.
How to make a music video with Adobe Premiere Pro:
- Gather Your Materials: Before you start, you’ll need video and audio clips for your project. Make sure they are in compatible formats, such as MP4 or MOV for video and WAV or AIFF for audio.
- Set Up Your Video Project: Once you have your materials gathered, open Adobe Premiere Pro and create a new project. Choose the size of the frame you’d like to work with and make sure it matches the aspect ratio of your video clips.
- Import Your Clips: With your project created, it’s time to import your video and audio clips. Click the ‘Import’ button in the upper-right corner of Premiere Pro and browse to where you have saved your files. Select each clip and click ‘Open’.
- Arrange Your Clips: You can now start arranging your clips on the timeline. To add a clip to the timeline, simply click and drag it into the frame. As you move each clip, make sure they are properly aligned with one another and fit within the video frame.
- Add Effects: If desired, Premiere Pro offers several built-in effects that can be applied to enhance your video clips. From adding titles to adjusting the color and brightness, these effects can help make your music video look more professional.
- Render Your Video: Now that you have completed editing your music video, it’s time to render your project. Click on ‘File’ in the top menu bar then select ‘Export > Media’. Choose a format for your video such as MP4 or MOV and click the ‘Export’ button.
Pricing: $20.99/month
Pros:
- Powerful editing tools & multi-track audio support
- 4K resolution output
- Access to sound effects and stock music library
Cons:
- Expensive subscription plans
- No 3D effects
iMovie
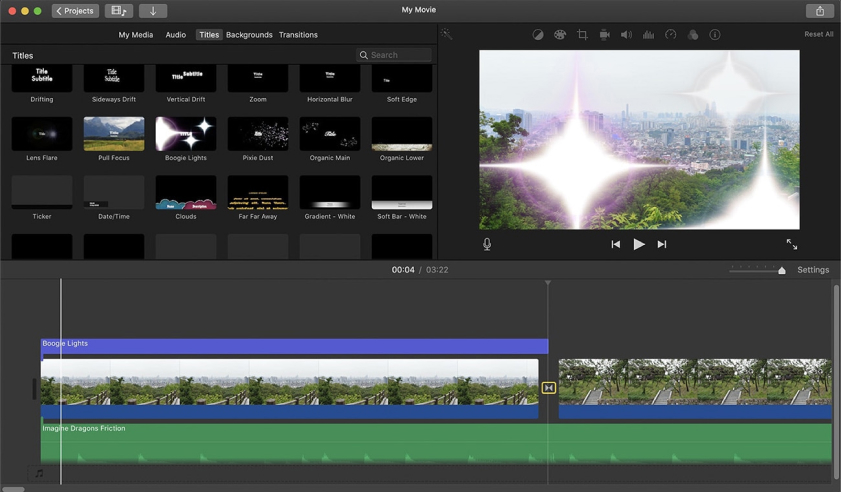
This is a great video editing software for beginners that offers all the basic features you need to create professional-looking music videos. It has an intuitive timeline-based workflow, drag-and-drop support, and access to royalty-free soundtracks and audio effects. Plus, it supports 4K resolution output.
How to make a music video with iMovie:
- Get your video clips and audio ready. Start by gathering together all the clips of video footage you want to use in your music video. You can also include still images if you want to. Next, load the audio track of the song you want to use as your soundtrack.
- Create a storyboard. Now that you have all the elements for your music video, it’s time to arrange them in a way that tells the story or brings out the emotion of your song. Begin by creating a storyboard with your clips and images in the order you want them to appear.
- Add transitions between scenes. To give your music video a professional look, add transition effects to move from one clip or image to another. You can choose from different transition styles such as fades, slides, and wipes that suit the mood of your song.
- Edit the audio. To make sure the music fits your video, use iMovie’s built-in music editing features to adjust the volume and equalize the sound.
- Add titles and effects. Enhance your music video with special effects such as lighting, filters, and text overlays. You can also add animated titles that introduce the video or help tell the story.
- Export your video. When you’re done editing, export your music video in the format of your choice and share it with the world!
Pricing: Free
Pros:
- Intuitive timeline-based workflow
- Drag-and-drop support
- Access to royalty-free soundtracks & audio effects
- 4K resolution output
Cons:
- Limited customization options
- No 3D effects
Avid Media Composer
Avid Media Composer is a professional-grade video editing software that offers all the features you need to create stunning music videos. It has advanced tools such as multi-track audio support, 4K resolution output, and motion tracking. Plus, it has an extensive library of licensed music and sound effects to choose from.
How to use Avid Media Composer:
- Gather Your Materials – Before beginning your project, make sure you have all the footage and audio needed for your music video. This might include video clips, photographs, or any other forms of media you’d like to include.
- Set Up Your Project – Open Avid Media Composer and create a new project, where you will be able to store all your files and settings for the music video. Create a bin, which is essentially a folder that holds clips, so it’s easier to manage them while working on the project.
- Import Your Media – Add all of your materials to the bin created in step 2. This can be done by selecting File > Import or using drag and drop if you’re working from an external hard drive.
- Organize Your Project – Arrange all of your clips in the timeline so that they are easy to find and work with. Create different tracks for music, audio, or voiceover clips.
- Add Visual Effects – Use Avid Media Composer’s built-in tools to add special effects and transitions to your video clips. This can help make the music video look more professional and interesting.
- Export Your Project– Once you’ve finished editing the music video, export it using the Export option in the File menu. This will create a high-quality file that can be uploaded to YouTube or other video sharing sites.
Pricing: Subscriptions starting from $50/month
Pros:
- Multi-track audio support & 4K resolution output
- Motion tracking
- Access to licensed music and sound effects
Cons:
- Expensive subscription plans
- No 3D effects
VSDC Video Editor
If you’re looking for a free video editor with all the features of professional software, VSDC Video Editor is your best bet. It has a timeline-based workflow with powerful editing tools, 4K resolution output, and access to royalty-free soundtracks and audio effects. Plus, it supports motion tracking and green screen effects.
How to use VSDC Video Editor:
- To get started, open up the program and select “New Project”. A new window will appear that allows you to customize the video settings, so choose an appropriate size for your music video.
- Once you have chosen the size for the video project, add any desired media files to the timeline by clicking on “+ Add Media Files” and then selecting the music video clips you want to use.
- To add a background image or video clip, click on “Add Image” or “Add Video”. You can also add titles and text by clicking “Titles and Text”. With these tools, you can create captions for each scene in your music video, making it more visually appealing.
- Next, you’ll need to add transitions and special effects to make your music video more interesting. To do this, click on “Transitions” or “Special Effects” in the left sidebar and select the type of transition you would like to use. You can also adjust the length of the transition and the start time by clicking on “Duration” and “Start time”.
- Once you have added transitions and special effects, you can add sound clips to the project by clicking on “Audio” in the left sidebar. You can import sound files from your computer or select from an extensive library of preloaded sounds.
- When you are finished editing your music video, click on “Export” in the top right corner of the window. The export settings allow you to select the video resolution, file type, and other options. Once you have selected your desired output settings, click “Export” to finalize your music video project.
Pricing: Free
Pros:
- Powerful editing tools & 4K resolution output
- Motion tracking & green screen effects
- Access to royalty-free soundtracks & audio effects
Cons:
- Limited customization options
- No 3D effects
How to make a music video if you are a beginner
No matter what type of music video you want to make, there’s a perfect video editor for the job. Whether you’re looking for an automatic editing solution, motion tracking and green screen effects, or an extensive library of royalty-free soundtracks and audio effects – there’s something out there that can help you create the perfect music video. All you need to do is find the right video editor for your specific needs. Some of the popular choices include WeVideo, KineMaster, DaVinci Resolve, Adobe Premiere Pro, iMovie, Avid Media Composer, and VSDC Video Editor. By taking advantage of their features and capabilities, you can create stunning music videos without any extra help or expertise.
- Gather your content. Start by gathering all the necessary footage and audio to make the music video. This may include filming yourself singing or playing an instrument, as well as sourcing any video clips that you want to use.
- Choose a video editor. Once you’ve gathered all the required content, it’s time to choose a video editor for your project. Select a program that has the features and capabilities you need to create a professional-looking music video.
- Add your content to the editor. Once you’ve chosen an appropriate video editor, start adding all of the gathered content into it. This usually involves dragging and dropping files onto the timeline or importing them from external devices such as cameras or phones.
- Edit and refine the content. With the required content in place, it’s time to start editing it according to your specific vision. Use the video editor’s tools to trim footage, adjust colors, apply effects, add titles or transitions, etc.
- Create a music video mix. When you’re happy with how the edited video looks, it’s time to add a music track. Choose one or multiple tracks that fit your visual theme and layer them over the footage.
- Export the final product. Finally, export the finished product from the video editor in the desired format and quality settings. Your music video is now ready for uploading on social media platforms or streaming services.
Making a music video can be a fun and creative process, even if you don’t have any prior experience with video editing. All it takes is the right software and some basic video editing skills to turn your vision into reality. Follow these steps and you’ll be able to create an amazing music video in no time!
How to choose the best music video maker for your personal needs
When choosing a music video maker, you should consider your budget, the level of customization and effects you want, and whether or not it offers access to licensed music. Each software has its own pros and cons, so make sure you take the time to evaluate all of them before making your decision. With the right music video maker, you can create stunning music videos with ease.
- Decide your budget & feature requirements – Before you start looking for a video maker, decide on your budget and the features you need. Do you need advanced features such as 4K resolution output, motion tracking or green screen effects?
- Evaluate all software options – Take the time to evaluate all the software options available to you and compare them based on their features, pricing, and ease-of-use.
- Try out different software platforms – It’s always a good idea to try out different video makers before committing to one. Most software providers offer free trials or demos that you can take advantage of.
- Read reviews & check out user testimonials – Take the time to read reviews and check out user testimonials to see what other people are saying about the software. This will help you make an informed decision.
- Compare pricing, features, pros & cons – Once you’ve narrowed down your choices, compare the pricing, features, pros and cons of each software to find the best one for your needs.
- Consider access to licensed music & sound effects – Lastly, consider the access to licensed music and sound effects that each software provides. This will help you make sure you have enough options when creating your music videos.
- Choose the best option that meets your needs – After considering all the factors mentioned above, choose the best option that meets your needs and budget.
By comparing different music video makers and taking into account your budget, feature requirements, ease-of-use, reviews, and access to licensed music, you should be able to find the best one for your personal needs. With the right software in place, you can create stunning music videos with ease.
By following these tips, you should be able to find the right video maker for your personal needs. With the right software, you can create high-quality music videos with ease.
Conclusion
As you can see, there are a wide variety of music video makers to choose from. Whether you’re looking for something free and simple or powerful with advanced features, there’s an option out there that will fit your needs. It all depends on what type of music video you want to create and how much money you have to spend. With the right tools in hand, creating stunning videos has never been easier!

For 8 years, Madeline has been working as an CGI specialist and digital video producer since his student years. Now, she’s our main consultant on every technical aspect that may arise during our tests and research.
In case you haven’t found something, or have a question on some specific guide, product, or just a feature, we are always ready to help.